We’ve all heard of bacon grease as being the liquid gold of the cooking world. Whatever dish you seem to throw it in comes out tasting savory, smokey, and delicious. However, there’s another slice of fatty heaven that not everyone knows about, and it’s just as good, if not better, than bacon grease.
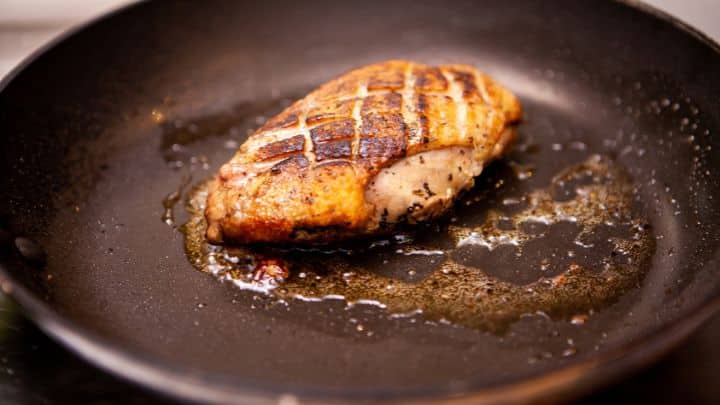
Duck fat is incredibly rich with subtly sweet and earthy flavors that give duck its signature taste. To get your hands on duck fat, you’ll have to work with a duck carcass, which can be intimidating for some. That’s why this beginner’s guide to rendering duck fat will be your saving grace.
Breaking Down Your Duck
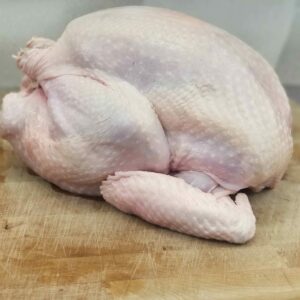
Buying just duck skin at your local butcher isn’t always possible, so you’ll likely have to buy a whole duck or parts of it, depending on how much fat you want. As a general rule, one pound of fat is equal to one eight-ounce cup of rendered fat. However, keep in mind that not everything you’re cutting off the bird will be pure fat. There will be some skin in there as well, and the more the merrier.
First, take a sharp knife and slice off as much skin and fat as possible. Don’t worry about cutting into the meat or making perfect slices. Make it your goal to get all the skin and fat off of the duck and set it aside. Once you have all the skin, you can go back and remove any bits of meat you may have cut off and slice the skin into more even pieces.
Rendering Your Duck Fat
Now that your duck skin and fat are properly prepared, you can toss them in a frying or stock pan, depending on your preference. Then, you’ll need to pour just enough water into your pot or pan to cover the fatty bits—you don’t want to submerge them entirely. Without water, your fat may burn too quickly, and not only will your kitchen smell bad, but the whole batch will be ruined.
Turn on the stove and keep it on low heat for about two to three hours, stirring occasionally to ensure nothing sticks to the bottom. The water will evaporate as it cooks, leaving behind a milky yellow substance. Keep cooking until the fat turns clear.
Cleaning and Storing Your Duck Fat
Once the fat has cleared up, turn off the heat. Take a clean mason jar, place a strainer over the top, and place a cheesecloth over the strainer. Slowly and carefully pour the fat into the jar so that the cheesecloth and strainer catch any leftover particles. Even if you can’t see bits of skin or meat in your fat, don’t skip this step. There may be tiny pieces you can’t see, and any leftover pieces will spoil your fat while it’s in storage.
You may need to wait 15 to 20 minutes for your fat to finish dripping, but once it’s done, you can seal and store the jar. In the fridge, duck fat will last about six months and up to a year in the freezer. Duck fat should be a milky white color once solid; if you notice any color changes or off-putting smells, it’s best to throw your fat away.
With this beginner’s guide to rendering duck fat, you’re ready to capitalize on this delicious cooking oil and create delicious potatoes, roasted vegetables, grilled cheese, popcorn, and more. However, you can’t render good duck fat without a quality bird.
At Vincent’s Meat Market, you can buy whole duck that we’ll ship right to your door.